This is the mono-repository for the backend services and their common codebase
Follow the following instructions to get the project ready to use ASAP.
Be sure you have installed in your system
- Python version 3 (recommended 3.8 or less) in your path. It will install automatically pip as well.
- A virtual environment, namely venv.
- Optionally for running Azure functions locally: Azure functions core tool.
-
Create and activate the environment,
In Windows:
#Create virtual enviroment
python -m venv .venv

#Execute virtual enviroment
.venv\Scripts\activate.bat
In Unix based operative systems:
#Create virtual enviroment
virtualenv .venv

#Execute virtual enviroment
source .venv/bin/activate
Note: If you're a linux user you will need to install an additional dependency to have it working.
Type in the terminal the following command to install the required dependency to have pyodbc working locally:
sudo apt-get install unixodbc-dev-
Install the requirements:
python3 -m pip install -r requirements/<app>/<stage>.txtIf you use Windows, you will use this comand:
python -m pip install -r requirements/<app>/<stage>.txtWhere
<app>is one of the executable app namespace, e.g.time_tracker_apiortime_tracker_events(Note: Currently, onlytime_tracker_apiis used.). Thestagecan bedev: Used for working locallyprod: For anything deployed
Remember to do it with Python 3.
Bear in mind that the requirements for time_tracker_events, must be located on its local requirements.txt, by
convention.
- Run
pre-commit install -t pre-commit -t commit-msg. For more details, see section Development > Git hooks.
Set environment variables with the content pinned in our slack channel #time-tracker-developer:
When you use Bash or GitBash you should use:
export MS_AUTHORITY=XXX
export MS_CLIENT_ID=XXX
export MS_SCOPE=XXX
export MS_SECRET=XXX
export MS_ENDPOINT=XXX
export DATABASE_ACCOUNT_URI=XXX
export DATABASE_MASTER_KEY=XXX
export DATABASE_NAME=XXX
export FLASK_APP=XXX
export AZURE_APP_CONFIGURATION_CONNECTION_STRING=XXX
export FLASK_DEBUG=True
If you use PowerShell, you should use:
$env:MS_AUTHORITY="XXX"
$env:MS_CLIENT_ID="XXX"
$env:MS_SCOPE="XXX"
$env:MS_SECRET="XXX"
$env:MS_ENDPOINT="XXX"
$env:DATABASE_ACCOUNT_URI="XXX"
$env:DATABASE_MASTER_KEY="XXX"
$env:DATABASE_NAME="XXX"
$env:FLASK_APP="XXX"
$env:AZURE_APP_CONFIGURATION_CONNECTION_STRING="XXX"
$env:FLASK_DEBUG="True"
If you use Command Prompt, you should use:
set "MS_AUTHORITY=XXX"
set "MS_CLIENT_ID=XXX"
set "MS_SCOPE=XXX"
set "MS_SECRET=XXX"
set "MS_ENDPOINT=XXX"
set "DATABASE_ACCOUNT_URI=XXX"
set "DATABASE_MASTER_KEY=XXX"
set "DATABASE_NAME=XXX"
set "FLASK_APP=XXX"
set "AZURE_APP_CONFIGURATION_CONNECTION_STRING=XXX"
set "FLASK_DEBUG=True"
Note: You can create .env (Bash, GitBash), .env.bat (Command Prompt), .env.ps1 (PowerShell) files with environment variables and run them in the corresponding console.
Important: You should set the environment variables each time the application is run.
-
Start the app:
flask run -
Open
http://127.0.0.1:5000/in a browser. You will find in the presented UI a link to the swagger.json with the definition of the api.
The project time_tracker_events is an Azure Function project. Its main responsibility is to respond to calls related to
events, like those triggered by Change Feed.
Every time a write action (create, update, soft-delete) is done by CosmosDB, thanks to bindings
these functions will be called. You can also run them in your local machine:
- You must have the Azure CLI and the Azure Functions Core Tools installed in your local machine.
- Be sure to authenticate with the Azure CLI if you are not.
az login- Execute the project
cd time_tracker_events
source run.sh
You will see that a large console log will appear ending with a message like
Now listening on: http://0.0.0.0:7071
Application started. Press Ctrl+C to shut down.
- Now you are ready to start generating events. Just execute any change in your API and you will see how logs are being generated by the console app you ran before. For instance, this is the log generated when I restarted a time entry:
[04/30/2020 14:42:12] Executing 'Functions.handle_time_entry_events_trigger' (Reason='New changes on collection time_entry at 2020-04-30T14:42:12.1465310Z', Id=3da87e53-0434-4ff2-8db3-f7c051ccf9fd)
[04/30/2020 14:42:12]  INFO: Received FunctionInvocationRequest, request ID: 578e5067-b0c0-42b5-a1a4-aac858ea57c0, function ID: c8ac3c4c-fefd-4db9-921e-661b9010a4d9, invocation ID: 3da87e53-0434-4ff2-8db3-f7c051ccf9fd
[04/30/2020 14:42:12]  INFO: Successfully processed FunctionInvocationRequest, request ID: 578e5067-b0c0-42b5-a1a4-aac858ea57c0, function ID: c8ac3c4c-fefd-4db9-921e-661b9010a4d9, invocation ID: 3da87e53-0434-4ff2-8db3-f7c051ccf9fd
[04/30/2020 14:42:12] {"id": "9ac108ff-c24d-481e-9c61-b8a3a0737ee8", "project_id": "c2e090fb-ae8b-4f33-a9b8-2052d67d916b", "start_date": "2020-04-28T15:20:36.006Z", "tenant_id": "cc925a5d-9644-4a4f-8d99-0bee49aadd05", "owner_id": "709715c1-6d96-4ecc-a951-b628f2e7d89c", "end_date": null, "_last_event_ctx": {"user_id": "709715c1-6d96-4ecc-a951-b628f2e7d89c", "tenant_id": "cc925a5d-9644-4a4f-8d99-0bee49aadd05", "action": "update", "description": "Restart time entry", "container_id": "time_entry", "session_id": null}, "description": "Changing my description for testing Change Feed", "_metadata": {}}
[04/30/2020 14:42:12] Executed 'Functions.handle_time_entry_events_trigger' (Succeeded, Id=3da87e53-0434-4ff2-8db3-f7c051ccf9fd)
In this API we are requiring authenticated users using JWT. To do so, we are using the library
PyJWT, so in every request to the API we expect a header Authorization with a format
like:
Bearer
In the Swagger UI, you will now see a new button called "Authorize":

when you click it then you will be notified that you must enter the content of the Authorization header, as mentioned
before:
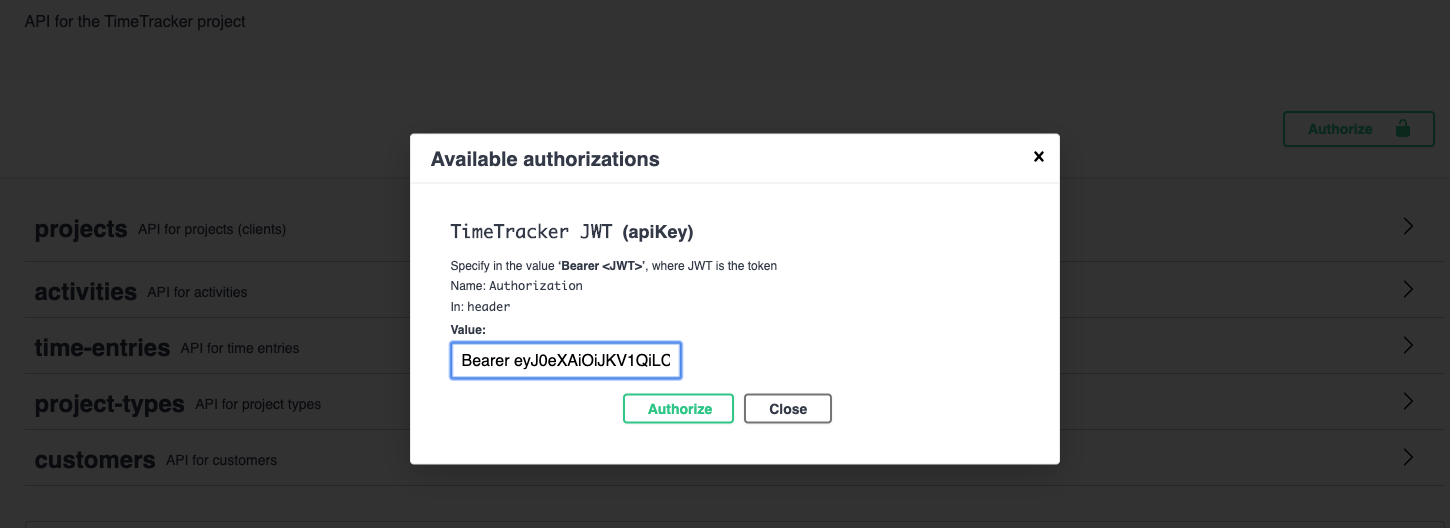
Click "Authorize" and then close that dialog. From that moment forward you will not have to do it anymore because the
Swagger UI will use that JWT in every call, e.g.

If you want to check out the data (claims) that your JWT contains, you can also use the CLI of PyJWT:
pyjwt decode --no-verify "<JWT>"
Bear in mind that this API is not in charge of verifying the authenticity of the JWT, but the API Management.
Due to the used technology and particularities on the implementation of this API, it is important that you respect the following notes regarding to the manipulation of the data from and towards the API:
- The recommended format for
DateTime strings in Azure Cosmos DB is
YYYY-MM-DDThh:mm:ss.fffffffZwhich follows the ISO 8601 UTC standard.
The Azure function project time_tracker_events also have some constraints to have into account. It is recommended that
you read the Azure Functions Python developer guide.
If you require to deploy time_tracker_events from your local machine to Azure Functions, you can execute:
func azure functionapp publish time-tracker-events --build localWe use pre-commit library to manage local git hooks, as developers we just need to run in our virtual environment:
pre-commit install -t pre-commit -t commit-msg
With this command the library will take configuration from .pre-commit-config.yaml and will set up the hooks by us.
Use the following commit message style. e.g:
'feat: TT-123 Applying some changes'
'fix: TT-321 Fixing something broken'
'feat(config): TT-00 Fix something in config files'
The value TT-### refers to the Jira issue that is being solved. Use TT-00 if the commit does not refer to any issue.
For example if your task in Jira is TT-48 implement semantic versioning your branch name is:
TT-48-implement-semantic-versioning
We are using Pytest for tests. The tests are located in the package
tests and use the conventions for python test discovery.
The integrations tests verifies that all the components of the app are working well together. These are the default tests we should run:
This command run all tests:
python3 -m pytest -v --ignore=tests/commons/data_access_layer/azure/sql_repository_test.pyIn windows
python -m pytest -v --ignore=tests/commons/data_access_layer/azure/sql_repository_test.py
Note: If you get the error "No module named azure.functions", execute the command:
pip install azure-functions
To run a sigle test:
pytest -v -k name-test
As you may have noticed we are ignoring the tests related with the repository.
In addition to the integration testing we might include tests to the data access layer in order to verify that the persisted data is being managed the right way, i.e. it actually works. We may classify the execution of all the existing tests as system testing:
python3 -m pytest -vThe database tests will be done in the table tests of the database specified by the variable SQL_DATABASE_URI. If this
variable is not specified it will automatically connect to SQLite database in-memory. This will do, because we are using
SQL Alchemy to be able connect to any SQL database maintaining the same
codebase.
The option -v shows which tests failed or succeeded. Have into account that you can also debug each test
(test_* files) with the help of an IDE like PyCharm.
To check the coverage of the tests execute
coverage run -m pytest -vTo get a report table
coverage reportTo get a full report in html
coverage htmlThen check in the htmlcov/index.html to see it.
If you want that previously collected coverage data is erased, you can execute:
coverage erase
There are available commands, aware of the API, that can be very helpful to you. You can check them out by running
python cli.py
If you want to run an specific command, e.g. gen_swagger_json, specify it as a param
as well as its correspondent options.
python cli.py gen_swagger_json -f ~/Downloads/swagger.json
We use angular commit message style as the standard commit message style.
-
The release is automatically done by the TimeTracker CI although can also be done manually. The variable
GH_TOKENis required to post releases to Github. TheGH_TOKENcan be generated following these steps. -
We use the command
semantic-release publishafter a successful PR to make a release. Check the library python-semantic-release for details of underlying operations.
- Build image
docker build -t time_tracker_api:local .- Run app
docker run -p 5000:5000 time_tracker_api:local- Visit
127.0.0.1:5000
Looking for a DB-agnostic migration tool, the only choice I found was migrate-anything.
A specific requirement file was created to run the migrations in requirements/migrations.txt. This way we do not mix
any possible vulnerable dependency brought by these dependencies to the environment prod. Therefore the dependencies
to run the migrations shall be installed this way:
pip install -r requirements/<app>/prod.txt
pip install -r requirements/migrations.txt
All the migrations will be handled and created in the python package migrations. In order to create a migration we
must do it manually (for now) and prefixed by a number, e.g. migrations/01-initialize-db.py in order to guarantee the
order of execution alphabetically.
Inside every migration there is an up and down method. The down method is executed from the persisted migration in
the database. When a down logic that used external dependencies was tested, it failed; whilst, I put that same logic in
the up method, it run correctly. In general, the library seems to present design issues.
Therefore, it is recommended to apply changes just in one direction: up.
For more information, please check out some examples
that illustrate the usage of this migration tool.
Basically, for running the migrations you must execute:
migrate-anything migrationsThey will be automatically run during the Continuous Deployment process.
- Python version 3 as backend programming language. Strong typing for the win.
- Flask as the micro framework of choice.
- Flask RestPlus for building Restful APIs with Swagger.
- Pytest for tests.
- Coverage for coverage.
- Swagger for documentation and standardization, taking into account the API import restrictions and known issues in Azure.
- Azure Functions bindings
for making
time_tracker_eventsto handle the triggers generated by our Cosmos DB database throw Change Feed.
Shared file with all the Feature Toggles we create, so we can have a history of them Feature Toggles dictionary
To run the dev enviroment in docker-compose:
docker-compose upCopyright 2020 ioet Inc. All Rights Reserved.